Wednesday, November 14, 2012

3 Photo Tricks For Teachers

1) Resizing Batch Photos

One of the things I like about the iPad is that it is easy to take photos, and the photo file size is relatively small. But sometimes I still need the clarity of a digital camera with a lot of megapixels. This is because I'm a terrible photographer.

My Hands Are Like The Waco Kid


So it's helped me a lot when I discovered that I could easily automate the resizing of photos using mac's Automator. I have always ignored this icon in the applications folder. So it was to my surprised delight that it can be an extremely useful utility.
Hey Little Guy, You Can Serve A Purpose!

I'm not going to rehash the instructions for doing this, since they are clearly explained here. But just in case that post gets deleted and I hit my head with a falling piano and forget how to do it, I'll repost their screen shot:
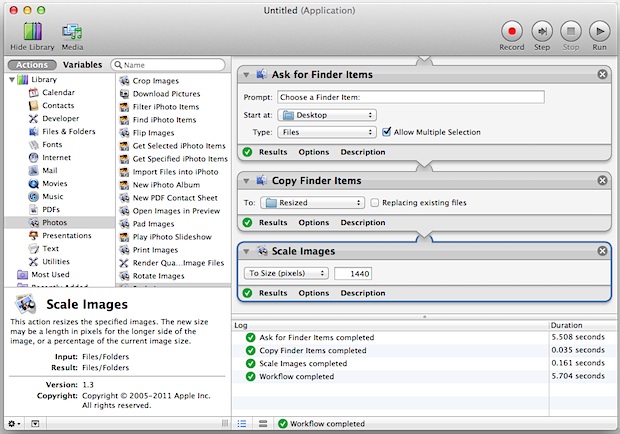
For Prosperity!

Wait. Is that enough? I mean a piano could cause a pretty severe memory issue. I pride myself on original content in this blog, but this is for the greater good. Okay, well just in case, this is a direct step-by-step taken from the link above:

How to create an Automator application that will resize a group of pictures:
  • Launch Automator and select to create a new Application
  • From the left side Library menu, click on “Files & Folders” then double-click on “Ask for Finder Items”
  • Now on the right side set the “Ask for Finder Items” choice to ‘Start at’ the Desktop and then click the checkbox next to “Allow Multiple Selection”
  • Next, from the same Files & Folders menu, find and double-click on “Copy Finder Items”
  • From the right-side pull-down menu alongside “To” choose “Other” and create a new folder called “Resized”
  • Optional: Again from the library, double-click on “Rename Finder Items” to add that action as well
  • Optional: From the pull-down menu choose “Add Text” and in the box below add “-resized” to appear after the file name
  • Now click on “Photos” from the left side Library menu, then double-click on “Scale Images”, and select the resized pixel width of images
  • Run the workflow to test it, otherwise choose “Save” to create an application that allows for drag & drop resizing of groups of images

2) Making Photos Look Like Coloring Book Pages

There have been several times in my teaching career where I needed to change a photo into a coloring book page. When I was teaching preschool in South Korea it's because I wanted the children to color themselves. More recently though it's because I make classroom money for our class economy, and I think it's only fitting to have the students featured on each denomination in our classroom currency.

There's a couple ways to do this. I'll demonstrate both by using Adobe Photoshop CS 5 and this photo:
"I'm About To Be Changed Into Money!"

The first way is to simply use the "Photocopy" Filter in Photoshop.
"Not As Glamorous As I Was Hoping"

That's the easy way. The next way produces an image a little clearer, but takes a lot more work. Again, I didn't create this method. It's posted in various places on the internets. Here's one of those places. 

STEP 1 - Duplicate The Background Layer
First duplicate the background layer. Go Layer> New> Layer via Copy. Now we have 2 layers, the Background Layer, and Layer 1.

STEP 2 - Desaturate The Photo
With Layer 1 selected, choose Image> Adjustments> Desaturate. This gives us a grayscale version of the photo.

STEP 3 - Duplicate Layer 1
At this point you must duplicate Layer 1. With Layer 1 selected, go Layer> New> Layer via Copy. Now we have 3 layers, the Background Layer, Layer 1 and Layer 2.

Next we'll be working with Layer 2.

STEP 4 - Invert Layer 2
With Layer 2 selected, go Image> Adjustments> Invert. This will make your photo look like a negative.

STEP 5 - Change The Layers Blend Mode To Color Dodge
In the Layers Palette change the Layers Blend Mode for this layer (Layer 2) to Color Dodge. This will make your photo almost completely white, but don't panic! Everything is going to work out just fine.

STEP 6 - Apply The Gaussian Blur Filter
Go Filter> Blur> Gaussian Blur. When the dialog box appears start by moving the Radius Slider all the way to the left. Once you've done that you can start to slowly move it to the right.


If you follow the 6 steps, you'll get a result that resembles this:
"My Shading Feels More Subtle"

Although this method is 5 more steps, I like the results more. It works better for our class currency too:
"Imagine What I Look Like On Bright Orange Paper!"


3) Spicing Up Photos

I've written about using Photofunia to make normal photos fun and exciting for my students. I do want to update that initial post by sharing the complete list of photo web filters I use. Here are my bookmarks I use when I want to play with a photo:
Celebrations & Signs in Teaching / (salamanca)

I won't talk about all of the above links, but I do want to feature a few. 
A) PhotoFunia: This is still my favorite place to alter a photo's reality. There's just a great big huge selection. I would have the children choose their own way to manipulate their photo, but there are a few inappropriate filters for 9 and 10 year olds, so I still choose for them. But I do give them choices.
I Guess There's A Third Way To Put Our Faces On Money

B) FunPhotoBox: Runs a close second to Photofunia. Just like Photofunia there are a lot of original, quality options. And what's really cool is the creativity of both sites really don't overlap. 
Well, We Do Live In Nepal

C) Pho.to: Is an interesting site that has a lot of potential. It offers a variety of ways to manipulate photos. The filters seem to be a bit lazy in quality, but there are a ton of choices. One sub-category is branding the subject of the photo with flag face paint. Unfortunately there are only 16 countries offered, and all are from Europe. This would be cool for an international school if they included a lot more countries.
The Stripes Of Spain

I've just scratched the surface with web photo filters, and I probably should revisit the awesome and not-so-awesome web tools available on this blog at some point. In the meantime, please take a look at the "pearl" bookmarks above. Photo filters are a lot of fun, and never fail to impress students.

Friday, November 9, 2012

10 Weeks In: Reflections On Edmodo (part 3)

This year I started using Edmodo instead of ProBoards as my platform of choice for our class forum.
I write about our past class use of Proboards here, and how I planned to use Edmodo in a similar capacity this year here.

This is the final part of a reflection on that decision to migrate platforms.

I created four virtual "rooms" in Edmodo for my students this year:

1) The Fantastic Forum 
2) The Homework Help Room
3) The Ape Room
4) The Reflection and Review Room 

In my previous two posts, I wrote about my experiences with the "Fantastic Forum" and the "Homework Help Room". In this final post in this series I'll discuss the last two rooms.

The Ape Room
The purpose of the Ape Room is to provide a monitored space for fun and safe content. To create a more dynamic community, my Ape Room is open to both fourth and fifth graders. My hope is that students will actually try to test the boundaries of that space. This gives me an opportunity to talk about appropriateness and audience.  I do that anyway, of course. But it's easier for students to learn from their past mistakes than from my lectures from anticipation of future mistakes.


It means that in order to have a risk-taking, mistake-making classroom, there has to be some opportunity to make mistakes. Because Batman's dad taught us that's the best way to learn.

Wait, YOU'RE Batman's dad?

And sometimes students don't know what is appropriate and what isn't. Case in point: Like most schools, probably, this video has been sweeping its way through the populace:


And like most schools younger populace, there are many that have no idea that it's a parody of Seoul's Gangnam district, and by extension, the excess and values of any rich population. What is noticeable from anyone that isn't fluent in Korean (and I'm not) is that:
1) It's strange and funny.
2) There's a close-up of a girl's butt.
3) The English in the video consists solely of "Hey sexy lady."

I'm not sure how I'd handle it if this video was posted in our Ape Room. There's content in the video that is a little too mature for my community. At the same time everyone in my class has already seen it multiple times. I'd probably remove it because it's always better to error on the side of caution. What I definitely would do is to try to put the content of the video in context, and use it as a basis for a lesson on parody. But I'll get to that.
This video wasn't posted in our Ape Room. Instead, a student posted "Teens React To Gangnam Style." The "Teens React" series is popular because apparently people like watching other people they don't know watch videos.
Let it go, Jackie

In that video, teens watch Gangnam style and provide insightful and witty comments that are neither insightful or witty or appropriate for 4th and 5th graders. So I removed it and it provided me with a teaching opportunity.

But I can and will go deeper. Because the original Gangnam style is a parody. And parodies are important to know about because:
1) Many parodies that are called parodies are not.
2) Recognizing what parodies are helps us look critically at what is being parodied, and we're not so quick to emulate the content.

So not only does the Ape Room provide us with a safe place to post and share fun content, but it also provides organic lessons that connect with our community from that content.


The Reflection and Review Room 
This is our least developed virtual space. I've mulled this over quite a bit, and for our online reflections, there are really two ways to go; using this space to reflect on specific projects and behaviors, or using the students' e-portfolios as their reflection platform.
Write now I'm using both. The kids write their original reflections in Edmodo, and copy/past them into their e-portfolios. I don't think that's the way to go, but until I figure which is the best method, I'll try them both.
I could try using a silver ball as our tool of choice

There are a couple of issues that I've discovered when using Edmodo as a reflection space:

1) Edmodo's forum, for whatever reason, seems to encourage short responses. I'm still trying to figure out why. But if I ask my kids to write a reflection directly to their portfolios, I usually get a more in depth response.
2) An e-portfolio platform is more intuitive to multiple questions and answers in a single reflection.

The only way that I can see using Edmodo as a reflective space be actually worth it is if I can get the children to feed off each other somehow. But how to do this exactly still eludes me.

Wednesday, November 7, 2012

10 Weeks In: Reflections On Edmodo (part 2)

This year I started using Edmodo instead of ProBoards as my platform of choice for our class forum.
I write about our past class use of Proboards here, and how I planned to use Edmodo in a similar capacity this year here.

This is the second part of a reflection on that decision to migrate platforms.

I created four virtual "rooms" in Edmodo for my students this year:

1) The Fantastic Forum 
2) The Homework Help Room
3) The Ape Room
4) The Reflection and Review Room 

In my previous post, I wrote about my experiences with the "Fantastic Forum". In this post I'll write about the "Homework Help Room".

The Homework Help Room
It's not easy being an international student in Kathmandu. There are increasing power cuts as the weather gets colder, and many kids have at least a two hour round trip commute to school each day. That doesn't leave a whole lot of time for homework on a lot of days. Coupled with that I try to give online work as much as possible, but the internet connections in this city are sporadic and slow.

"Maybe you should try not giving any work then."

Despite these obstacles, I still give homework. And because of these obstacles students have a heck of a lot of reasons why they can't do their work- some of them valid, and some of them not. To help counter this and create more of a culture of out-of-class responsibility, I try to do two things:
1) Require that children communicate directly with me, either by calling or by emailing, if they are unable to do their homework.
2) Set up the Homework Help Room in Edmodo.


The Homework Help Room is helpful in two situations:
- Homework that is given over the weekend
- Homework that involves larger projects.

It hasn't been so great with assignments that are due the next day, because I don't want to be spending my home time constantly checking it, and neither do my students. So I try to visit it a couple times in the evening, and in general this has helped with work where the kids have more time to do it. 

What I think is really nice about it though is when my students help each other.
My goal for the rest of the term is to encourage this. I can think of two ways I could. 
The first way to encourage helping is to actually build homework assignments in the homework help room. I don't like this way as much. To encourage this I could give out Edmodo's virtual badges, but I hate that way. So I'm going to dismiss this first way since it will ultimately require extrinsic motivation to encourage children to help each other. 

The second is to make a "volunteer" homework help group whose job it is to patrol the room every night. I might bring this up in a class meeting. The idea is fun and holds a certain amount of responsibility and activism so I think I'll get close to 100% of students who would like to do this. The trick is to make sure those who volunteer don't forget. But this way is driven by an intrinsic motivation so I actually think as long as there is reflection involved in the process, it will be far more successful.

The other thing I need to do is to clarify to the class about organizing their requests for help. The Homework Help Room is riddled with posts that look like this: 

Where two or more students are posting completely different problems in one thread discussion. It's hard for me to catch all of these because they're posted everywhere, so a refresher course of how to post in this room would be good for the class.

Monday, November 5, 2012

10 Weeks In: Reflections On Edmodo (part 1)

This year I started using Edmodo instead of ProBoards as my platform of choice for our class forum.
I write about our past class use of Proboards here, and how I planned to use Edmodo in a similar capacity this year here.

This is a reflection on that decision to migrate platforms.

I created four virtual "rooms" in Edmodo for my students this year:

1) The Fantastic Forum 
2) The Homework Help Room
3) The Ape Room
4) The Reflection and Review Room 

I'll talk about my observations of how each of these virtual rooms have worked in Edmodo in turn.

The Fantastic Forum 
This is the virtual room that was essentially hosted by ProBoards last year. I switched hosts because I wanted to consolidate our virtual spaces, but as a forum, Edmodo doesn't come close to the flexibility and power of ProBoards.

First, a little background.

I love the idea of a class forum for a number of reasons. It allows me to extend classroom discussions beyond the actual classroom, it teaches online discussion behavior, and it provides yet another way for the children to be exposed to writing with an authentic audience.

Edmodo does not provide as strong of a backbone as ProBoards to support all three of these goals. I'll break it down:

A) Extending Classroom Discussions
Edmodo really isn't meant to be used as a forum platform, much like Facebook isn't meant to be used in that way either. The great thing about a discussion board is that participants in any given thread have the same abilities as the person who started the thread. For example, if I started a thread called, "What's your favorite song and why?" every participant could not only answer with a reason, but they could also attach their favorite song for everyone to listen to. In Edmodo this is just not possible. I can post an initial note that embeds a song,

or a photo or a video...

But "commenters" can only respond with text. It would be brilliant if commenters could respond with multimedia, like a real forum thread:

The one nice feature that Edmodo holds over ProBoards in this regard is that Edmodo has a "Library", an online multimedia depository that organizes and holds any content that I want to share with my kids. That's a nice feature, and one that message boards don't have.

B) Teaching Online Discussion Behavior
One of the main benefits of a forum is that we can learn from each other. In order for this to be true though, we need to get in the habit of reading and commenting on each other's ideas. Edmodo is horrible at supporting this, because there is no quote function. This means that if you want to respond to another commenter, you pretty much have to write a response immediately after that commenter, or else the responses become a tangled mess:

This is annoying, and is the reason why forums invented the quote function:

It's something very simple that makes a big difference in both how we view and interact with online discussions. Instead of responding only to the person who started the discussion, students can begin to interact with the larger online community.

C) Writing For An Authentic Audience
Both ProBoards and Edmodo is by invitation only. Anyone with an email account can apply to be a member of a board I set up in ProBoards. Any one with a group code can join a virtual room in Edmodo. This is great because I think it's important for students to be able to write to a larger audience beyond their teacher and even their classmates. Ideally parents could join the forum and the discussion. The difference is how Edmodo views its participants. You're either a teacher, a student, or a parent. If you're signed in as a parent though, you only have access to your child's grades or specific notifications regarding assignments or upcoming events- all the ways that I don't use Edmodo with my kids.

Parents don't have access to the virtual rooms. In order for the parents to participate in room discussions, they have to register as students. This is an added level of inconvenience and weirdness. I haven't attempted to ask parents to pose as fake students so they can participate in our class discussions.

So does it make sense to continue using Edmodo as a forum? I'm not sure. The advantage is that it helps consolidate our online presence, which is extremely important for this age group. Consistency and simplicity are key factors to building online behaviors, and exposing the kids to too many tools would be both overwhelming and counter productive. On the other hand Edmodo is not meant to be a true forum, and perhaps I'm breaking one of my cardinal rules: Never use a technology for a purpose other than what it's designed for.

I guess I have the rest of the year to figure it out.

In my next post I'll discuss the class' experience with the three other virtual rooms I set up in Edmodo.

Friday, November 2, 2012

Class Meeting and Survey Monkey

Every Wednesday our class has a Class Meeting. This is a deviation from our normal Morning Routine. It gives a chance for our class to talk about important community issues, and empowers the students as agents of change. Our Class Meetings our a combination of the Responsive Classroom approach, and Donna Styles' approach.
Anyway, this post isn't about how I structure class meetings. Instead it's about one particular class meeting- The last one I had with my fourth graders, and a last-second decision that ended up being pretty cool. 
Our focal point of this particular class meeting was to vote on this year's Elementary T-Shirt designs. The students had created designs in art class using the Drawing app in Google Drive. The problem was as I got to school and started to prepare for the day is that I found I didn't have access to their designs. They hadn't been shared with me yet. What I would have normally done was to present each of the drawings to the class on the SMART Board and have them vote for the top three. 

Our 4th Grade T-Shirt Designs

But because I didn't have access to their drawings from my account, I couldn't do that. This made me realize of an alternative route. I remembered that our class houses the floor's laptop cart. So I thought we could bring our laptops to our class meeting, and have each student show their design. 

But then I thought about voting. Normally I have the children close their eyes to vote for things.  But since they were going to have their laptops anyway, I thought about using an online voting tool.
At first I thought I might be able to use Edmodo's polling feature, but I wanted voters to vote for multiple people. I don't know if this is possible in Edmodo. I don't think it is.
Then I remembered Survey Monkey.
I've tried to use Survey Monkey before when I tried to migrate our Elementary After School Activities sign-ups to be wholly electronic.  Survey Monkey and other web-based surveys* were terrible for this. But there are a sub-genre of web based tools specifically for sign-ups, which was just recently pointed out to me.

However Survey Monkey seemed to be the perfect application for this day's task. I opened it up, designed a survey in 5 minutes, and emailed the link to my students' accounts.
Showing off the T-shirt designs on the individual laptops was a bit clumsy, but the voting was slick, anonymous, and quick. The results, of course were instantaneous. It was awesome. A nice alternative to the "heads down" approach. When I have class voting in the future, Survey Monkey will be how I prefer to do it.

*Actually, Fluid Surveys had a paid feature where what I needed was promised to be possible. However the feature was broken. The support team couldn't figure it out, and so I got a refund. Our After School Activities remained paper-based until this season. But I finally found a way to make the transition from paper to the cloud.
Related Posts Plugin for WordPress, Blogger...